
The Rise of Open-Concept Showers in 2025
Goodbye to bulky shower doors! Open-concept showers offer a sleek, open feel that makes your bathroom look and feel more spacious. By eliminating the need for doors or curtains, this design allows for a seamless flow throughout the space, creating a bright, airy, and modern aesthetic. Not only do these showers enhance the overall look of your bathroom, but they also make cleaning easier and improve accessibility.
Bathrooms are no longer just about function—they are evolving into luxurious, spa-like retreats. One of the biggest trends leading this transformation is the open-concept shower. Sleek, modern, and effortlessly elegant, these showers are redefining the way we experience bathroom spaces.
Smart Technology in Bathroom
Tech-savvy bathrooms are becoming a must-have, making daily routines easier and more enjoyable. In 2025, smart technology bathroom is bringing convenience and luxury into the bathroom. Imagine starting your day with a smart mirror that gives you the latest news, weather updates, and your schedule while you get ready.
Heated floors keep your space warm and cozy, all controlled right from your smartphone. Pair these with smart showers that let you set the perfect water temperature, adjust the flow, and even play your favorite music for a spa-like experience.
Smart Storage Solutions for a Clutter-Free Bathroom
A clutter-free bathroom is essential for a clean and relaxing space, and in 2025, integrated storage solutions are more important than ever. Homeowners are embracing built-in shelves, hidden cabinets, and recessed niches to keep their essentials organized and easily accessible.
Maximizing storage doesn’t stop at cabinets—drawer organizers and bins play a key role in keeping toiletries and cosmetics neatly arranged. These simple additions can make a big difference, especially in smaller bathrooms where every inch of space matters.
The shower area also deserves attention when it comes to storage. Built-in shelves and recessed niches provide a stylish and practical way to store shampoos, soaps, and other bath products. These features help maintain a tidy, streamlined look while ensuring everything you need is within reach.
As bathroom trends continue to focus on both function and aesthetics, integrated storage solutions will remain a top priority for homeowners looking to create a clean, efficient, and stylish space.
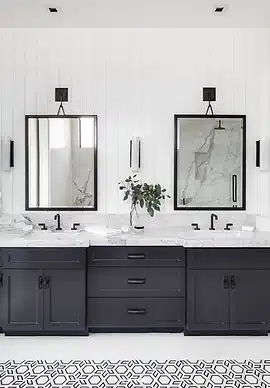
Floating Vanities: The Must-Have Trend for 2025
Floating vanities are taking over bathroom design this year! These sleek, wall-mounted vanities create the illusion of more space by keeping the floor clear—perfect for smaller bathrooms. They also add a modern, stylish touch and make cleaning much easier.
For an extra wow factor, add under-cabinet lighting. The soft glow not only highlights the vanity’s design but also creates a warm, inviting atmosphere.
Earthy Neutrals: The Perfect Shades for a Warm, Timeless Bathroom
When it comes to bathroom design, color plays a huge role in setting the mood. In 2025, earthy neutrals like beige, taupe, and warm gray are taking center stage. These natural tones bring a sense of warmth and elegance to any bathroom, making the space feel cozy, inviting, and effortlessly stylish.
One of the best things about earthy neutrals is their versatility. Whether you love a rustic, traditional, or modern aesthetic, these colors work beautifully with almost any style. They create a soft, calming environment while allowing other design elements like wood, stone, or metal to shine.